nazo6 noteblog

RustでKeyballのファームウェアを書きたい話

作成:2024/03/23

更新:2024/03/23

この記事は、Zennにも投稿しています。
KeyballのファームウェアはQMKを使ったC言語のものになっています。ですがやはりRust、使いたいですよね?
間違ってRP2040のProMicroを買ってしまった方がなんとRustでkeyballのファームウェアを作っており、不可能ということはなさそうです。

Keyball46組み立て日記 〜間違えてRP2040を買ったそこのあなたに〜 - /var/log/hikalium

TL; DR Keyball46はいいぞ ProMicroにはAVR版とRP2040版がある ピン配置の互換性はあれど、命令セットは完全に異なるので「ファームウエアを書けとささやくのよ、私のゴーストが」という方以外はAVR版を間違えずに買いましょう まあ最悪間違えても一週間くらいでなんとかなる(当社調べ) みんな自作キーボードをやろう! はじまり みなさんは、Keyball46という素晴らしい自作キーボードキットをご存知ですか? そう、なんと、キーボードにトラックボールがついてるんです!最高ですよね! ということで、秋葉原にある自作キーボードのお店こと遊舎工房さんから速攻でポチりました。ちょう…

hikalium.hatenablog.jp

ということでハードウェアの知識が全く無いながらKeyballのファームウェアをRustで書くことにチャレンジしてみました。
この記事では一応動きそうな道筋は見つけたけど…という所までとなります

RustでのAVR向けプログラム作成

通常、Keyballに搭載するProMicroにはAVRのATMega32U4というのが載っています。
ではRustでAVR向けのエコシステムがどれだけ充実しているのかという話ですが、avr-halというクレートが存在しており、さらにATMega32U4もサポートしているようです。これはいいですね。
また、ProMicro用のテンプレートが用意されていて、
cargo +stable install ravedude
cargo install cargo-generate
cargo generate --git https://github.com/Rahix/avr-hal-template.git
を実行後にProMicroのテンプレートを選択すればLチカのコードを用意してくれます。
内容はこのようになっています。
#![no_std]
#![no_main]

use panic_halt as _;

#[arduino_hal::entry]
fn main() -> ! {
let dp = arduino_hal::Peripherals::take().unwrap();
let pins = arduino_hal::pins!(dp);

let mut led = pins.led_rx.into_output();
loop {
led.toggle();
arduino_hal::delay_ms(1000);
}
}
とりあえずこれを実行してみましょう。cargo runすることで書き込みまでやってくれます。便利ですね。
RAVEDUDE_PORT=COM13 cargo run --release
コンパイルが終わったらリセットしたらEnterを押してねと言われるのでその通りにすればプログラムが書き込まれて無事Lチカされるはずです。
とても簡単にできて感動です。
また、RAVEDUDE_PORTはUSBシリアルポートの番号です。筆者はWindowsを使用しているのでCOM{X}という値になります。
この値はQMK Toolboxなどを使うと簡単に調べることができます。

USB接続

さて、Lチカはできましたがキーボードとして使う以上USBで通信ができなければいけません。USBスタックを自力で書くのは流石にキツそうだなと思いクレートを探し回っていたところatmega-usbdという正に望み通りのクレートがありました。

GitHub - agausmann/atmega-usbd: Rust usb-device support for ATmega chips

Rust usb-device support for ATmega chips. Contribute to agausmann/atmega-usbd development by creating an account on GitHub.

github.com

Rustではusb-deviceというクレートが基盤となるトレイトを提供しており、そのトレイトを各ターゲット向けに実装することでusb-device上のライブラリであるusbd-hidなどのクレートを使えるようになっています。
そしてatmega-usbdusb-deviceのATMega向け実装というわけです。
そのatmega-usbdのexampleを改変して、キーを押したら何か反応するプログラムをなんとか実装したものが以下になります。
#![no_std]
#![cfg_attr(not(test), no_main)]
#![feature(abi_avr_interrupt)]
#![deny(unsafe_op_in_unsafe_fn)]
#![feature(lang_items)]

use core::panic::PanicInfo;

use arduino_hal::pac::PLL;
use arduino_hal::port::mode::Floating;
use arduino_hal::{
delay_ms, entry, pins,
port::{
mode::{Input, Output},
Pin,
},
Peripherals, Pins,
};
use atmega_usbd::{SuspendNotifier, UsbBus};
use avr_device::{asm::sleep, interrupt};
use usb_device::{
class_prelude::UsbBusAllocator,
device::{UsbDevice, UsbDeviceBuilder, UsbVidPid},
};
use usbd_hid::{
descriptor::{KeyboardReport, SerializedDescriptor},
hid_class::HIDClass,
};

#[entry]
fn main() -> ! {
let peripherals = Peripherals::take().unwrap();
let pins: Pins = pins!(peripherals);
let indicator = pins.led_tx.into_output();

let pll = peripherals.PLL;
let usb = peripherals.USB_DEVICE;

// Configure pll
// Set to 8MHz
pll.pllcsr.write(|w| w.pindiv().set_bit());
// Run 64MHz timers
pll.pllfrq
.write(|w| w.pdiv().mhz96().plltm().factor_15().pllusb().set_bit());
// And enable
pll.pllcsr.modify(|_, w| w.plle().set_bit());
// Wait until the bit is set
while pll.pllcsr.read().plock().bit_is_clear() {}

let usb_bus = unsafe {
static mut USB_BUS: Option<UsbBusAllocator<UsbBus<PLL>>> = None;
&*USB_BUS.insert(UsbBus::with_suspend_notifier(usb, pll))
};

let hid_class = HIDClass::new(usb_bus, KeyboardReport::desc(), 1);
let usb_device = UsbDeviceBuilder::new(usb_bus, UsbVidPid(0x1209, 0x0001))
.manufacturer("nz")
.product("keyball")
.build();

let trigger = pins.a2.into_floating_input();

unsafe {
USB_CTX = Some(UsbContext {
usb_device,
hid_class,
trigger: trigger.downgrade(),
indicator: indicator.downgrade(),
});

interrupt::enable()
}

loop {
sleep();
}
}

static mut USB_CTX: Option<UsbContext<PLL>> = None;

#[interrupt(atmega32u4)]
fn USB_GEN() {
unsafe { poll_usb() };
}

#[interrupt(atmega32u4)]
fn USB_COM() {
unsafe { poll_usb() };
}

unsafe fn poll_usb() {
let ctx = unsafe { USB_CTX.as_mut().unwrap() };
ctx.poll();
}

struct UsbContext<S: SuspendNotifier> {
usb_device: UsbDevice<'static, UsbBus<S>>,
hid_class: HIDClass<'static, UsbBus<S>>,
trigger: Pin<Input<Floating>>,
indicator: Pin<Output>,
}

impl<S: SuspendNotifier> UsbContext<S> {
fn poll(&mut self) {
if self.trigger.is_low() {
let report = ascii_to_report(b'a').unwrap();
self.hid_class.push_input(&report).ok();
self.indicator.set_high();
} else {
self.hid_class.push_input(&BLANK_REPORT).ok();
self.indicator.set_low();
}

if self.usb_device.poll(&mut [&mut self.hid_class]) {
let mut report_buf = [0u8; 1];

if self.hid_class.pull_raw_output(&mut report_buf).is_ok() {
if report_buf[0] & 2 != 0 {
self.indicator.set_high();
} else {
self.indicator.set_low();
}
}
}
}
}

const BLANK_REPORT: KeyboardReport = KeyboardReport {
modifier: 0,
reserved: 0,
leds: 0,
keycodes: [0; 6],
};

fn ascii_to_report(c: u8) -> Option<KeyboardReport> {
let (keycode, shift) = if c.is_ascii_alphabetic() {
(c.to_ascii_lowercase() - b'a' + 0x04, c.is_ascii_uppercase())
} else {
match c {
b' ' => (0x2c, false),
_ => return None,
}
};

let mut report = BLANK_REPORT;
if shift {
report.modifier |= 0x2;
}
report.keycodes[0] = keycode;
Some(report)
}

#[panic_handler]
fn panic(info: &PanicInfo) -> ! {
let peripherals = unsafe { Peripherals::steal() };
let pins = pins!(peripherals);

let ctx = unsafe { USB_CTX.as_mut().unwrap() };
let mut rx = pins.led_rx.into_output();
let mut tx = pins.led_tx.into_output();
loop {
for _ in 0..2 {
rx.set_high();
tx.set_high();
delay_ms(300);
rx.set_low();
tx.set_low();
delay_ms(300);
}
for _ in 0..2 {
rx.set_high();
tx.set_high();
delay_ms(100);
rx.set_low();
tx.set_low();
delay_ms(100);
}
}
}

#[lang = "eh_personality"]
#[no_mangle]
pub unsafe extern "C" fn rust_eh_personality() -> () {}
これはピンa2の列が押されている時にaという文字を送信するプログラムになります。また、panic時にLチカをするので分かりやすくなっています。
まだ全くキーボードにはなっていませんが、これを拡張していけば少なくともキーボードとして使えるファームウェアを書くこと自体はそこまで難しくなさそうです。
ちなみにこの時点で容量は
avrdude.exe: 11740 bytes of flash verified
と、約12kbとなっています。ここからフル機能のキーボードやらトラックボールやらを実装して28kbに収まるかは正直よくわかりません。

USBが認識されない?

ここまで来ればあとはがんがんコードを書いていくだけ…と思ったのですがこのファームウェアには大分致命的な欠点があり、接続した際に7割ぐらいの確率でエラーになってしまいます。
うまくいくと
../../../../resource/public/blog/2024/03/keyball-firm-rust/success.png

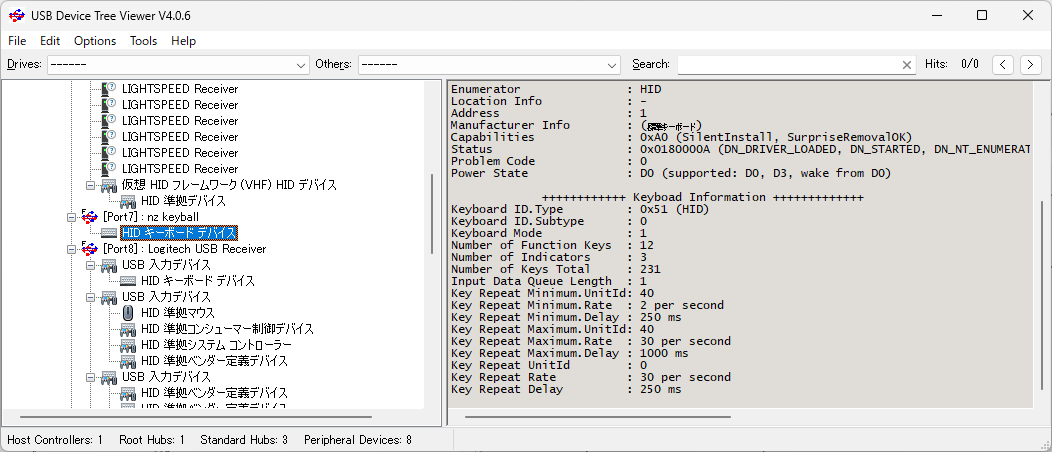
のように、きちんとキーボードとして認識されていますが、失敗すると
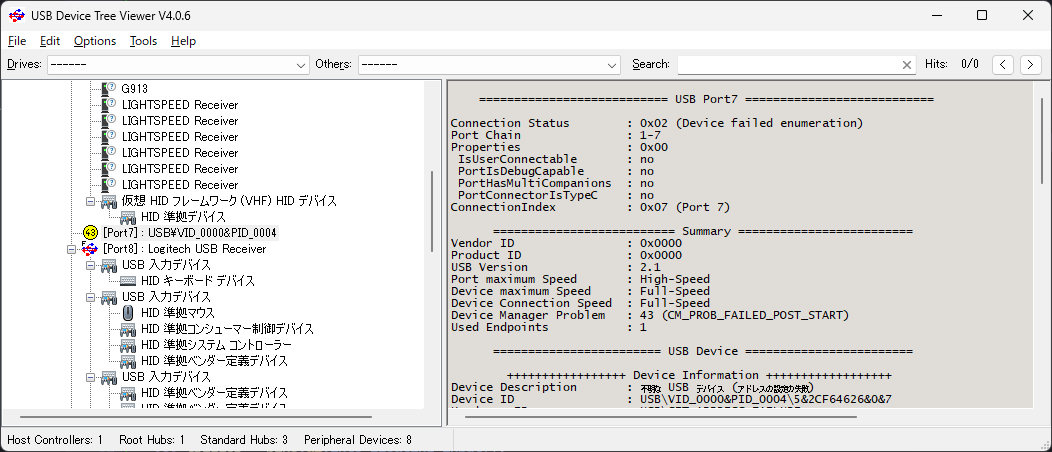
../../../../resource/public/blog/2024/03/keyball-firm-rust/fail.png

のようにエラーとなってしまいます。
公式ファームウェアだとこうはならないので恐らく何かソフトウェアの問題だとは思うのですが…
悲しいことに自分にはUSBの知識が全然なく、この問題を今のところ解決できていないのでこの記事はここまでとします。
この記事で使用したコードは

GitHub - nazo6/keyball-rust-firmware

Contribute to nazo6/keyball-rust-firmware development by creating an account on GitHub.

github.com

に置いておきます。

最後に

なんだか中途半端な所で終わってしまって申し訳ないのですがこの問題さえ解決できればあとは懸念点は容量ぐらいなので、RustでKeyballのファームを書くのも現実的になるのではないかと思います。
もしどなたか解決策など分かったら是非教えて頂きたいです。
(もしかしたらRP2040版のほうが容量も多いし今ならembassy-rpとかもあるし作り易かったりして…?)